Memory Reordering Caught in the Act
Original post: https://preshing.com/20120515/memory-reordering-caught-in-the-act/
Translator: Seyeon Oh (vee@nullptr.kr)
When writing lock-free code in C or C++, one must often take special care to enforce correct memory ordering. Otherwise, surprising things can happen.
C 또는 C++에서 Lock-free code를 작성할 때 정확한 memory ordering을 적용하기 위해 항상 주의해야 합니다. 그렇지 않으면 예상치 못한 놀라운 일이 벌어질 수 있습니다.
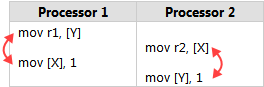
Intel lists several such surprises in Volume 3, §8.2.3 of their x86/64 Architecture Specification. Here’s one of the simplest examples. Suppose you have two integers
XandYsomewhere in memory, both initially zero. Two processors, running in parallel, execute the following machine code:
Intel의 x86/64 Architectures에 관한 Software Developer’s manual Volume 3의 §8.2.3 절에서 몇 가지의 경우에 대한 설명을 찾아볼 수 있습니다. X와 Y라는 이름의 0으로 초기화 되어있는 두 개의 정수 변수를 가정해봅시다. 그리고 두 개의 병렬로 동작하는 코어를 가진 프로세서 상에서 아래 machine code를 실행합니다:

Don’t be thrown off by the use of assembly language in this example. It’s really the best way to illustrate CPU ordering. Each processor stores 1 into one of the integer variables, then loads the other integer into a register. (
r1andr2are just placeholder names for actual x86 registers, such aseax)
예제가 Assembly로 되어있다고 해서 바로 포기할 필요는 없습니다. 이 예제는 CPU ordering을 가장 잘 설명하는 예제입니다. 각 프로세서는메모리상의 변수 한 개 (X 또는 Y)에 정수 값 1을 쓰고(store)하고, 이후에 자신의 register에 다른 변수 (Y 또는 X)로부터 읽어옵니다(load). (r1과 r2는 eax와 같은 x86의 특정 레지스터를 지칭하는 placeholder name을 의미합니다.)
Now, no matter which processor writes 1 to memory first, it’s natural to expect the other processor to read that value back, which means we should end up with either r1 = 1, r2 = 1, or perhaps both. But according to Intel’s specification, that won’t necessarily be the case. The specification says it’s legal for both r1 and r2 equal 0 at the end of this example - a counterintuitive result, to say the least!
여기서 어떤 프로세서가 1을 메모리에 먼저 쓰는지는 상관이 없고, (병렬로 수행되므로) 어떤 프로세서든 다른 프로세서가 쓴 값(1)을 읽을 것이라 예상할 수 있습니다. 즉, 병렬 수행의 결과가 r1 = 1이거나 r2 = 1 또는 r1 = r2 = 1인 경우를 예상할 수 있다는 것을 의미합니다. 그러나 Intel specification에 따르면 이 예제의 수행 결과가 직관적이지 않지만 r1 = r2 = 0의 결과 또한 나타날 수 있습니다.
One way to understand this is that Intel x86/64 processors, like most processor families, are allowed to reorder the memory interactions of machine instructions according to certain rules, as long it never changes the execution of a single-threaded program. In particular, each processor is allowed to delay the effect of a store past any load from a different location. As a result, it might end up as though the instructions had executed in this order:
왜 이런 결과가 일어날까요? 대부분의 프로세서들과 마찬가지로 Intel x86/64 프로세서가 single-threaded (단일 스레드) 프로그램의 실행 결과에 영향을 끼치지 않는 특정 규칙에 따라 메모리와 관련된 명령어들의 순서를 **재배치(reorder)**하는 것을 허용합니다. 특히, 각 프로세서는 쓰기 작업(store)이 관련이 없는 다른 위치(location)의 읽기 작업(load)보다 늦게 시작되도록 지연시킬 수 있습니다. 결과적으로 이 순서대로 명령어가 수행되는것을 허용합니다:
Let’s Make It Happen
It’s all well and good to be told this kind of thing might happen, but there’s nothing like seeing it with your own eyes. That’s why I’ve written a small sample program to show this type of reordering actually happening. You can download the source code here.
이제 이런 종류의 일(reordering)이 일어날 수도 있다는 설명은 어느정도 충분히 되었지만 실제로 직접 보는 것만큼 확실하게 전달이 되지는 않을 것입니다. 그래서 이런 유형의 재정렬(reordering)이 어떻게 일어나는지 실제로 확인할 수 있는 간단한 예시 프로그램을 준비했습니다. 여기에서 소스코드를 다운로드 받을 수 있습니다.
The sample comes in both Win32 version and POSIX version. It spawns two worker threads which repeat the above transaction indefinitely, while the main thread synchronizes their work and checks each result.
예시 프로그램은 Win32 버전과 POSIX 버전 두 가지로 되어있습니다. 프로그램은 위의 메모리 트랜잭션을 무기한 반복하는 두 개의 worker thread를 생성하고, main thread는 두 worker thread의 작업을 동기화하고 결과를 검증합니다. (즉, 각 worker thread는 위 기계어 코드 예시에서 각 프로세서에 해당됩니다 - 역자 주)
Here’s the source code for the first worker thread.
X,Y,r1, andr2are all global, and POSIX semaphores are used to coordinate the beginning and end of each loop.
다음은 첫 번째 worker thread의 소스 코드입니다. X, Y, r1, r2는 전역 변수이고, POSIX semaphore들은 각 루프의 시작과 끝을 제어하는데 사용됩니다. (main thread에서 worker간 동기화를 위해 사용합니다 - 역자 주)
sem_t beginSema1;
sem_t endSema;

int X, Y;
int r1, r2;

void *thread1Func(void *param)
{
    MersenneTwister random(1);                // Initialize random number generator
    for (;;)                                  // Loop indefinitely
    {
        sem_wait(&beginSema1);                // Wait for signal from main thread
        while (random.integer() % 8 != 0) {}  // Add a short, random delay

        // ----- THE TRANSACTION! -----
        X = 1;
        asm volatile("" ::: "memory");        // Prevent compiler reordering
        r1 = Y;

        sem_post(&endSema);                   // Notify transaction complete
    }
    return NULL;  // Never returns
};
A short, random delay is added before each transaction in order to stagger the timing of the thread.
Remember, there are two worker threads, and we’re trying to get their instructions to overlap. The random delay is achieved using the sameMersenneTwisterimplementation I’ve used in previous posts, such as when measuring lock contention and when validating that the recursive Benaphore worked.
매 트랜잭션마다 짧은 random delay를 추가하여 thread의 명렁어 수행에 시간차를 두었습니다.
주의해서 보아야할 것은 두 개의 worker thread가 있고, 각 worker thread에서 수행되는 명렁어들이 overlap 되도록 만드려고 한다는 것입니다. 예제에서 random delay는 measuring lock contention과 recursive Benaphore 포스팅에서 사용한 Mersenne Twister를 사용합니다.
Don’t be spooked by the presence of the
asm volatileline in the above code listing. This is just a directive telling the GCC compiler not to rearrange the store and the load when generating machine code, just in case it starts to get any funny ideas during optimization. We can verify this by checking the assembly code listing, as seen below. As expected, the store and load occur in the desired order. The instruction after that writes the resulting registereaxback to the global variabler1.
예제에서 asm volatile구문에 겁먹을 필요는 없습니다. 이것은 단지 GCC compiler가 컴파일의 최적화 과정에서 store 명령과 load 명령의 순서를 바꾸지 않도록 지시하는 지시자입니다. 아래의 컴파일된 바이너리의 어셈블리 코드를 통해 우리가 의도한 결과대로 컴파일이 되었음을 확인할 수 있습니다. 예상대로 store 명령과 load 명령이 원하는 순서대로 (원본 소스코드의 명령 순서 - 역자 주) 일어납니다. write 명령의 수행 결과는 eax register에 임시로 저장되었다가 다시 global 변수인 r1에 저장됩니다.
$ gcc -O2 -c -S -masm=intel ordering.cpp
$ cat ordering.s
    ...
    mov    DWORD PTR _X, 1
    mov    eax, DWORD PTR _Y
    mov    DWORD PTR _r1, eax
    ...
The main thread source code is shown below. It performs all the administrative work. After initialization, it loops indefinitely, resetting
XandYback to 0 before kicking off the worker threads on each iteration.
아래는 모든 관리 작업을 담당하는 main thread의 소스 코드입니다. 초기화가 끝나면 무한 루프를 반복하면서 매 iteration마다 worker thread의 iteration이 시작되기 전X와 Y의 값을 0으로 다시 설정합니다.
Pay particular attention to the way all writes to shared memory occur before
sem_post, and all reads from shared memory occur aftersem_wait. The same rules are followed in the worker threads when communicating with the main thread. Semaphores give us acquire and release semantics on every platform. That means we are guaranteed that the initial values ofX = 0andY = 0will propagate completely to the worker threads, and that the resulting values ofr1andr2will propagate fully back here. In other words, the semaphores prevent memory reordering issues in the framework, allowing us to focus entirely on the experiment itself!
특별히 주의를 기울여야할 것은 모든 공유 메모리에 대한 write 명령들을 sem_post 이전에 배치해야하고, 모든 공유 메모리에 대한 load 명령은 sem_wait 이후에 배치해야 한다는 것입니다. 이 규칙은 worker thread들과 main thread가 서로 통신할 때 worker thread에서도 동일하게 적용됩니다. Semaphore 는 모든 플랫폼에서 acquire and release sematics를 제공합니다. 즉, 초기 값 X = 0과 Y = 0이 각 worker thread로 완전히 전파(propagate)될 것이고, r1과 r2의 결과 값이 main thread로 완전히 전파될 것임을 보장합니다. 정리하자면 semaphore는 이 (test) framework상에서 (컴파일러에 의한) 메모리 재정렬(memory reordering) 문제를 방지하여 실험 자체에 집중할 수 있도록 하는 장치입니다.
int main()
{
    // Initialize the semaphores
    sem_init(&beginSema1, 0, 0);
    sem_init(&beginSema2, 0, 0);
    sem_init(&endSema, 0, 0);

    // Spawn the threads
    pthread_t thread1, thread2;
    pthread_create(&thread1, NULL, thread1Func, NULL);
    pthread_create(&thread2, NULL, thread2Func, NULL);

    // Repeat the experiment ad infinitum
    int detected = 0;
    for (int iterations = 1; ; iterations++)
    {
        // Reset X and Y
        X = 0;
        Y = 0;
        // Signal both threads
        sem_post(&beginSema1);
        sem_post(&beginSema2);
        // Wait for both threads
        sem_wait(&endSema);
        sem_wait(&endSema);
        // Check if there was a simultaneous reorder
        if (r1 == 0 && r2 == 0)
        {
            detected++;
            printf("%d reorders detected after %d iterations\n", detected, iterations);
        }
    }
    return 0;  // Never returns
}
Finally, the moment of truth. Here’s some sample output while running in Cygwin on an Intel Xeon W3520.
마침내 진실이 드러나는 순간입니다. Intel Xeon W3520 CPU와 Cygwin을 이용해 실험한 결과입니다.
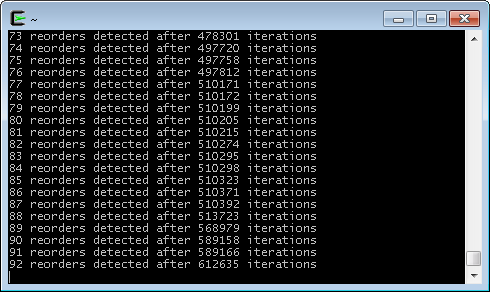
And there you have it! During this run, a memory reordering was detected approximately once every 6600 iterations. When I tested in Ubuntu on a Core 2 Duo E6300, the occurrences were even more rare. One begins to appreciate how subtle timing bugs can creep undetected into lock-free code.
그리고 당신도 이 진리를 가지고 있습니다! 이 실험에서는 약 6600번의 반복마다 메모리 재정렬이 한번 발견되었습니다. 필자의 Core 2 Duo E6300 CPU와 Ubuntu를 이용한 실험에서는 훨씬 더 드문 빈도로 문제가 발생했습니다. 여기서 우리는 미묘한 타이밍 버그가 lock-free 코드 상에서 보여지지 않는 상태로 어떻게 발생하고 있는지 생각해볼 필요가 있습니다.
Now, suppose you wanted to eliminate those reorderings. There are at least two ways to do it. One way is to set thread affinities so that both worker threads run exclusively on the same CPU core. There’s no portable way to set affinities with Pthreads, but on Linux it can be accomplished as follows:
메모리 재정렬을 완전히 제거하고 싶다고 가정해봅시다. 적어도 두 가지 방법이 있습니다. 한가지 방법은 두 worker thread가 동일한 CPU 코어에서만 수행되도록 thread affinity를 지정하는 것입니다. Pthreads 라이브러리와 결합하여 affinity를 설정하는 포터블한 코드를 작성할 수는 없지만, Linux에서는 다음의 코드를 이용해 수행할 수 있습니다.
	cpu_set_t cpus;
    CPU_ZERO(&cpus);
    CPU_SET(0, &cpus);
    pthread_setaffinity_np(thread1, sizeof(cpu_set_t), &cpus);
    pthread_setaffinity_np(thread2, sizeof(cpu_set_t), &cpus);
After this change, the reordering disappears. That’s because a single processor never sees its own operations out of order, even when threads are preempted and rescheduled at arbitrary times. Of course, by locking both threads to a single core, we’ve left the other cores unused.
이렇게 변경한 코드에서 메모리 재정렬 현상은 완전히 사라집니다. 그 이유는 각 thread가 임의의 시간에 중단되거나 다시 스케줄링 되더라도 단일 프로세서에서는 명령어들이 out-of-order로 수행되더라도 언제나 순차적으로 수행되는 것과 똑같이 보이기 때문입니다.
On a related note, I compiled and ran this sample on PlayStation 3, and no memory reordering was detected. This suggests (but doesn’t confirm) that the two hardware threads inside PPU may effectively act as a single processor, with very fine-grained hardware scheduling.
연관된 이야기입니다만, 이 샘플을 PlayStation 3에서 컴파일하여 실행했을 때에는 메모리 재정렬이 나타나지 않았습니다. 이는 PPU 내의 두 개의 hardware thread가 매우 세분화된 (fine-grained) 하드웨어 스케줄링을 통해 단일 프로세서처럼 동작할 수 있음을 시사하지만, 명확히 확인되지는 않았습니다.
Preventing It With a StoreLoad Barrier
Another way to prevent memory reordering in this sample is to introduce a CPU barrier between the two instructions. Here, we’d like to prevent the effective reordering of a store followed by a load. It common barrier parlance, we need a StoreLoad barrier. Store
메모리 재정렬 문제를 방지하는 또 다른 방법은 아래 예시와 같이 두 명령어 사이에 CPU 배리어를 추가하는 것입니다. Store -> Load 순서로 이어지는 명령어의 재정렬 문제를 효율적인 방법으로 StoreLoad라고 불리는 종류의 배리어를 사용합니다.
On x86/64 processors, there is no specific instruction which acts only as a StoreLoad barrier, but there are several instructions which do that and more. The
mfenceinstruction is a fully memory barrier, which prevents memory reordering of any kind. In GCC, it can be implemented as follows:
x86/64 프로세서에서는 StoreLoad 배리어의 역할만을 수행하는 명령어가 없지만, 더 많은 역할을 하는 다른 명령어들이 있습니다. mfence 명령어는 모든 종류의 메모리 재정렬을 방지하는 fully memory barrier입니다. GCC에서는 다음과 같이 이 명령어를 사용할 수 있습니다.
    for (;;)                                  // Loop indefinitely
    {
        sem_wait(&beginSema1);                // Wait for signal from main thread
        while (random.integer() % 8 != 0) {}  // Add a short, random delay

        // ----- THE TRANSACTION! -----
        X = 1;
        asm volatile("mfence" ::: "memory");  // Prevent memory reordering
        r1 = Y;

        sem_post(&endSema);                   // Notify transaction complete
    }
Again, you can verify its presence by looking at the assembly code listing:
컴파일된 바이너리의 어셈블리 코드를 직접 확인하여 mfence 명령어가 추가된 것을 확인할 수 있습니다.
    ...
    mov    DWORD PTR _X, 1
    mfence
    mov    eax, DWORD PTR _Y
    mov    DWORD PTR _r1, eax
    ...
With this modification, the memory reordering disappears, and we’ve still allowed both threads to run on separate CPU cores.
mfence 명령어를 추가한 코드에서는 두 개의 코어에서 동시에 두 worker thread가 수행되는 상황에서도 메모리 재정렬 문제가 발생하지 않습니다.
Similar Instructions and Different Platforms
Interestingly,
mfenceisn’t the only instruction which acts as a fully memory barrier on x86/64. On these processors, any locked instruction, such asxchg, also acts a fully memory barrier - provided you don’t use SSE instructions on write-combined memory, which this sample doesn’t. In fact, the Microsoft C++ compiler generatesxchgwhen you use theMemoryBarrierintrinsic, at least in Visual Studio 2008.
흥미롭게도 mfence는 x86/64 프로세서에서 메모리 배리어를 설치하는 유일한 명령어가 아닙니다. xchg와 같은 locked instruction 계열의 명령어또한 Write combined memory에서 SSE 명령어를 사용하지 않는다면 fully memory barrier로 작용합니다. 실제로 Visual C++ 2008 컴파일러에서는 MemoryBarrier intrinsic을 사용하는 경우 xchg명령어를 생성합니다.
The
mfenceinstruction is specific to x86/64. If you want to make the code more portable, you could wrap this intrinsic in a preprocessor macro. The Linux kernel has wrapped it in a macro namedsmp_mb, along with related macro such assmp_rmbandsmp_wmb, and provided alternate implementations on different architectures. For example, on PowerPC,smp_mbis implemented assync.
mfence 명령어는 x86/64 종속적인 명령어입니다. 포터블한 메모리 배리어 코드를 작성하고싶다면 전처리기 매크로를 이용하여 각종 컴파일러의 intrinsic을 wrapping해야합니다. Linux kernel은 (mfence를) smp_rmb와 smp_wmb와 같은 세분화된 메모리 배리어를 의미하는 매크로들에 smp_mb라는 이름의 매크로를 래핑하는 방식으로 다른 프로세서 아키텍처에 적용될 수 있도록 합니다. 예를 들어 PowerPC에서는 smp_mb가 sync명령어로 구현됩니다.
All these different CPU families, each having unique instructions to enforce memory ordering, with each compiler exposing them through different intrinsics, and each cross-platform project implementing its own portability layer… none of this helps simplify lock-free programming! This is partially why the C++11 atomic library standard was recently introduced. It’s an attempt to standardize things, and make it easier to write portable lock-free code.
모든 다른 종류의 CPU 패밀리들은 각각 고유한 메모리 재배치 관련 명령어를 가지고 있으며, 각각의 컴파일러에서 이 명령어들과 관련된 intrinsics를 제공하는 방식으로 이들을 사용할 수 있도록 하고 있습니다. Cross-platform 프로젝트들은 호환성 레이어를 구현하여 이를 통합해야만 합니다… (하지만) 이런 것들은 lock-free programming을 쉽게 만드는데 전혀 도움이 되지 않습니다! 이것이 C++ atomic library 표준이 등장하게 된 배경입니다. 새로운 C++ 표준은 메모리 재배치들에 대한 명세를 표준화 하려는 시도이자 portable한 lock-free code를 보다 쉽게 작성하기 위한 시도입니다.